
")
Introduction to Advanced analytics (part 1)
This is a a series of articles which is supposed to help a beginner, setup advanced tracking tools that will help him gather more information about the way visitors are interacting with a website. We are going to focus mostly on Google tools, because they are free, easily accessible for everyone and reliable. When using free tools you need to keep in mind that there will be a few limitations, especially when working with websites with a lot of traffic, but this shouldn’t be an issue for most beginner users.
The first part of this series is describing steps needed to make your website compatible with analytics applications. The tool described below will allow the website owner or the analytics administrator to easily make changes to the website, without having to go through the development team! This means that any change, can come at no cost and outside the website’s development / release cycle and without the IT team’s involvement. The process described below, makes it also easy to give someone the option to make changes to your analytics implementation, without having complete access to your rest of your website’s files (e.g. FTP access).
Tag Management System (TMS)
Tag management systems started appearing in 2009 and are used to dynamically deploy client-side scripts on a website. This means that every time you want to deploy a new HTML or JavaScript source code snippet on your website, you don’t need to do it by editing your website’s files. You can just use the TMS admin interface to do that. Watching the following video (by Simo Ahava) will give you a much better understanding of how a TMS is used and why it can make your life easier.
Google Tag Manager (GTM)
A free and easy-to-use TMS is offered by Google, under the (intuitive) name “Tag manager“! You’ll need to register for a new account and create a new container in your account. After this process is complete, you’ll get a container ID (something like “GTM-12345678”). This ID links your website to your GTM account. To activate and enable GTM for your website, you’ll need to ask for your development team’s help. They have to install, on your website, the source code snippet that appeared after you created your account (like the following example):
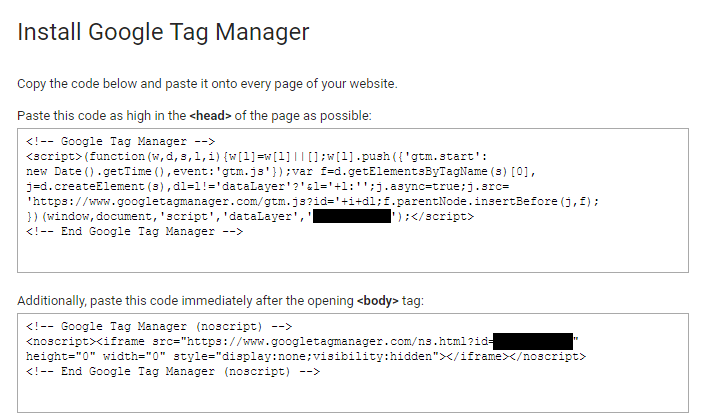
The source code must be available as close as possible to the opening of the website’s <head> section and on all the website pages, accessible by the visitors! This means that your IT team must try to include this source code snippet in the website’s universal header file.
If you need more details about GTM checkout this article, which is a quick guide on how to get started.
If you are using WordPress you can try to install GTM using one of the following plugins (appearing in order of preference):
- DuracellTomi’s Google Tag Manager for WordPress
When using this plugin, you only need to type/paste your container ID. Everything else will happen automatically. The plugin will also provide more advanced functionalities allowing you to get more detailed information about your website in GA. We’ll review this in more detail in the future. Avoid this plugin if you want to start with just a basic GTM implementation and you are a complete amateur with Google Analytics. - Insert Header & Footers
This plugin will allow you to paste the complete script directly in your website’s header section. Just copy the GTM script from your account and paste it inside the “Scripts in header” text-box. Avoid this plugin if you are looking for something that will do everything automatically - Google tag manager
This plugin will automatically add only the GTM script. The only thing you need to do is type/paste your container ID. Avoid this plugin if you are looking for a quick and customizable way to add GTM to your website.
Making sure that GTM is deployed correctly
Finally you need to make sure that the changes you completed are working correctly. The easiest way is to use GTM’s preview mode. Google Tag Manager’s preview mode allows you to browse a site on which your container code is implemented as if the current container draft was deployed. Sites with preview mode enabled will display a debugger pane below the website content so that you can inspect which tags fired and in which order. This means that when browsing your website in Preview mode, all pages should have a debugger pane at their end.
See more details here on how to enable Preview mode
Additional content
If you want to learn more about GTM and Tag management systems, take a look at the following links:
- Google Tag Manager Fundamentals
- What is Tag Management?
- Econsultancy posts about Tag management
- Google Tag Manager Help center