How to edit the hosts file in MacOS, Windows and Linux
The hosts file is a text file that maps hostnames to IP addresses. Upon typing a url address on the browser, the system is checking if there is a relevant entry on the hosts file and gets the corresponding IP address, else it resolves the IP via the active connection’s DNS servers.
The hosts file can also be edited to block certain hostnames (like ad-serving/malicious hosts), or used for web development purposes, i.e. to redirect domains to local addresses.
Editing the hosts file in MacOS
- Open the Terminal.app
Start typing Terminal on the Spotlight, or by going into Applications -> Utilities -> Terminal. - Open the hosts file
Open the hosts by typing on the Terminal that you have just opened:$ sudo nano /private/etc/hosts
Type your user password when prompted.
- Edit the hosts file
The hosts file contains some comments (lines starting with the # symbol), as well as some default hostname mappings (e.g. 127.0.0.1 – localhost). Simply append your new mappings underneath the default ones. Or edit one of the default values if you know what you are doing! You can navigate the file using the arrow keys. - Save the host file
When done editing the hosts file, press control-o to save the file. Press enter on the filename prompt, and control-x to exit the editor. - Flush the DNS cache
You can issue a simple Terminal command to flush the DNS cache, in order to force your host file changes to take immediate effect:$ dscacheutil -flushcache
Editing the hosts file in Windows
- Locate the hosts file
Windows 95/98/Me c:\windows\hosts
Windows NT/2000/XP Pro c:\winnt\system32\drivers\etc\hosts
Windows XP Home/Vista/7 c:\windows\system32\drivers\etc\hosts
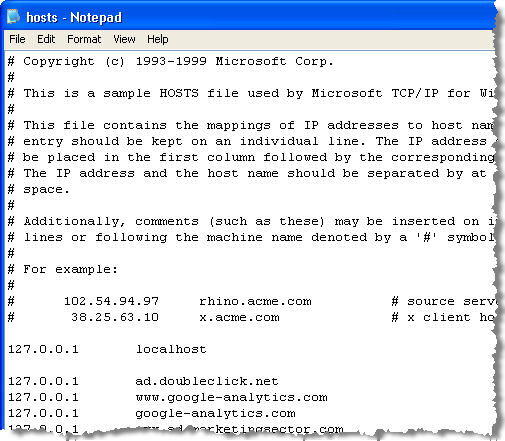
(you may need administrator access for Windows NT/2000/XP/Vista/7) - Open the hosts file with notepad
- Edit the hosts file
Add a new line to the hosts file for the desired mapping, that looks like the following:127.0.0.1 www.local-host.com
You type the IP address you want to map, press the tab key and then the host names that will lead to the specified IP address. You can type multiple host names, separated by a space
- Save your changes
- Flush the PC’s DNS cache
Type the following in a command prompt window (Open a command prompt by typing cmd in Start>Run)ipconfig /flushdns
If the changes don’t work, try rebooting your PC
What can I do if Hosts isn’t working under Windows 2000 or XP Pro?
First, you should try using “127.0.0.1 localhost” at the top of your hosts file. If that doesn’t work, try converting the entire Hosts file from 0.0.0.0 to the 127.0.0.1 format.
Those of you who use Windows 2000/XP Pro and use the very large version of the Hosts file may experience system slowdowns and slow connections. Most often, this is noticed by those with dialup connections, but may occur with broadband connections as well.
Windows 2000/XP Pro also includes a service known as the DNS cache. You can locate it in your services listed as “DNS Client”. To use Hosts you may need to stop and disable this service. Some machines seem to run Hosts without disabling this service. It is safe to turn it off and disable it. You will likely never notice it is gone. As far as I can tell, no other Windows operating system offers such a service.
Sometimes extra spaces after the host names may cause the file not to work.
Editing the hosts file in Linux
- Locate the hosts file
The file is usually found in /etc/hosts - Add your entry to the hosts file
- Make sure this file is used for host name lookups
Open the file: /etc/host.conf
This file should have at least the following line: order hosts,bind
That has host lookups use the hosts file before doing a DNS query with bind. - Try your entry in the web browser (you may need to reboot your PC for it to work)


