
GTM Mastery: ChatGPT’s Top Tips for Speeding Up Your Workflow!
If you’re tired of grappling with Google Tag Manager (GTM) and longing for expert advice to make your work more efficient, you’re in the right place. In this article, we’re unleashing ChatGPT’s top five tips to supercharge your GTM workflow. You won’t want to miss these game-changing hacks, from automating repetitive tasks to getting insights that will make your analytics sing.
Rewrite incompatible source code
GTM only supports source code compatible with ES5. For instance, you cannot register variables using const or let. But if you have an ES6 source code snippet you want to use in GTM just ask GPT to transform it for you with a prompt like the following example:
Can you convert the following JS source code to a version compatible with ES5

const textMessage = "Mastering GTM with ChatGPT";
console.log(textMessage);
This will return the same source code in a fully ES5-compatible format:
var textMessage = "Mastering GTM with ChatGPT";
console.log(textMessage);
It works great even with more complex and longer source code snippets
Write RegEx for conditional triggers
If you are uncomfortable with RegEx just ask an LLM to write it for you (preferably not politely :P). Let’s examine this with the following examples:
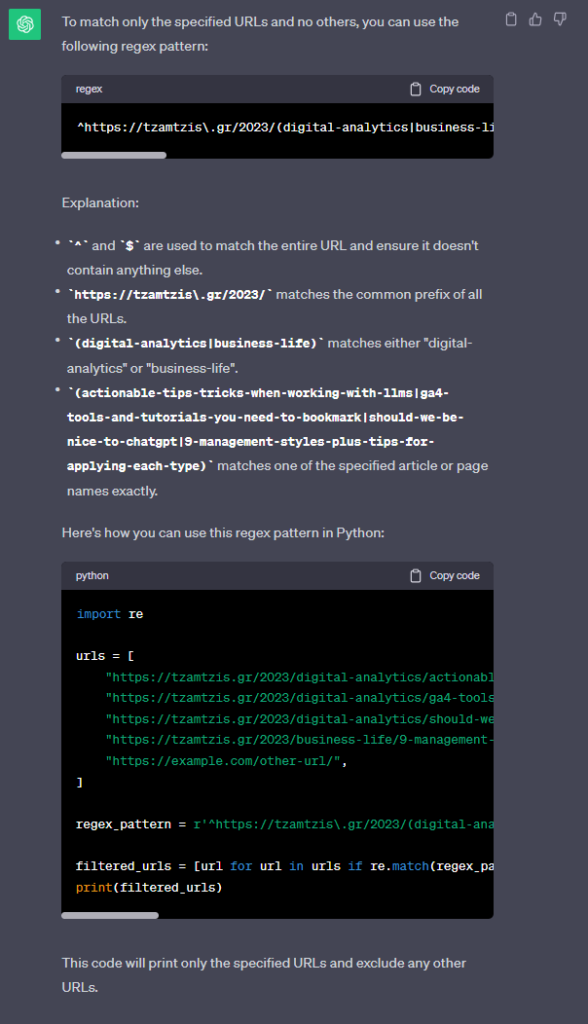
Write a regex expression that will be true only for the following URLs:
- https://tzamtzis.gr/2023/digital-analytics/actionable-tips-tricks-when-working-with-llms/
- https://tzamtzis.gr/2023/digital-analytics/ga4-tools-and-tutorials-you-need-to-bookmark/
- https://tzamtzis.gr/2023/digital-analytics/should-we-be-nice-to-chatgpt/
- https://tzamtzis.gr/2023/business-life/9-management-styles-plus-tips-for-applying-each-type/
Write a regex expression that will be true only for strings containing the word "tzamtzis" and does not include the word "gpt"
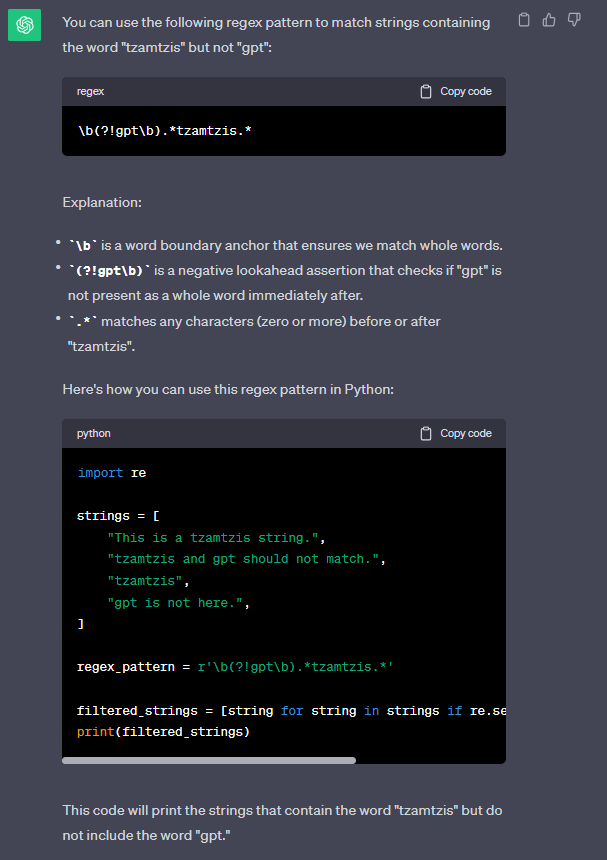
The great thing when using ChatGPT to generate RegEx is you will also get an explanation for the complete regex rule and a source code example in Python!
Write HTML & CSS like an experienced web designer
Using GTM to apply changes to the design of a website is a common practice. It’s not ideal as these changes might not be visible to visitors with strict adblockers. Still, it’s a quick way to fix minor issues without messing with the source code of the website or to apply changes that will only work for specific audiences.
Let’s take a look at a few examples:
Use CSS to turn all website images black and white
Prompt: Write CSS code to make every image on the website black and white
Response:
/* Apply grayscale filter to all images */
img {
  filter: grayscale(100%);
}
Inject HTML elements using JavaScript
Prompt: Use JS to also create a loading icon on top of the whole page using the image on the following URL path: https://upload.wikimedia.org/wikipedia/commons/b/b1/Loading_icon.gif?20151024034921 and show it for 4 seconds
Response:
// Create a new div element for the loading overlay
const loadingOverlay = document.createElement('div');

// Set the CSS styles for the loading overlay to cover the whole page
loadingOverlay.style.position = 'fixed';
loadingOverlay.style.top = '0';
loadingOverlay.style.left = '0';
loadingOverlay.style.width = '100%';
loadingOverlay.style.height = '100%';
loadingOverlay.style.backgroundColor = 'rgba(255, 255, 255, 0.9)'; // Semi-transparent white background
loadingOverlay.style.zIndex = '9999'; // Ensure it's on top of other content
loadingOverlay.style.display = 'flex';
loadingOverlay.style.justifyContent = 'center';
loadingOverlay.style.alignItems = 'center';

// Create an image element for the loading icon
const loadingIcon = document.createElement('img');

// Set the source (src) attribute to the loading image URL
loadingIcon.src = 'https://upload.wikimedia.org/wikipedia/commons/b/b1/Loading_icon.gif?20151024034921';

// Set any other attributes you might need, e.g., alt text for accessibility
loadingIcon.alt = 'Loading...';

// Add the loading icon to the loading overlay
loadingOverlay.appendChild(loadingIcon);

// Add the loading overlay to the document body
document.body.appendChild(loadingOverlay);

// Function to remove the loading overlay after 4 seconds
function removeLoadingOverlay() {
  // Remove the loading overlay from the document
  document.body.removeChild(loadingOverlay);
}

// Set a timeout to hide the loading overlay after 4 seconds
setTimeout(removeLoadingOverlay, 4000);

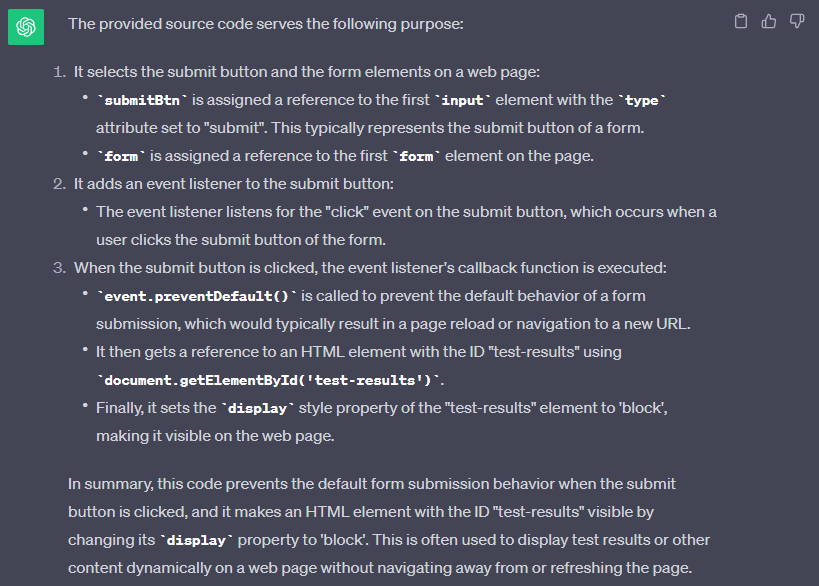
Get help when trying to understand existing source code
Prompt: What’s the purpose of the following piece of source code?
const submitBtn = document.querySelector('input[type="submit"]');
const form = document.querySelector('form');

submitBtn.addEventListener('click', (event) => {
  event.preventDefault();

  const testResults = document.getElementById('test-results');
  testResults.style.display = 'block';
});
Response: